Having determined that our recent electrical fiasco was not something I had done (see Laural's posts Christmas Traditions ... New and Old & Let There Be Light!, and finding a great deal on a 5+1+1 programmable thermostat (on sale for $39.99 at Canadian Tire) tonight, I decided that it was time to get rid of this beast:

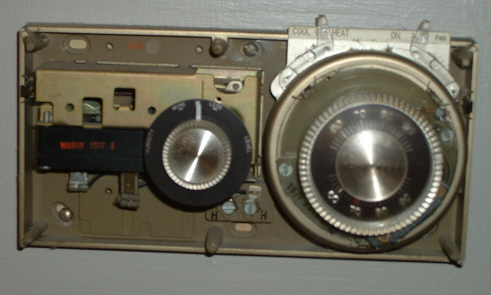 The first thing I did was pop off the cover... Actually, let me rephrase that... The first thing I did before messing around with this was to make sure I disconnected the furnace circuit at the fuse panel, after I read something about killing myself and blowing up my house if I wasn't careful... Next I pried off the temperature assembly, being careful to watch it slip out of my hand (mercury filled switch and all) and bounce merrily down the dining room to the glee of Matthew ...
... who had decided to watch and see if daddy would kill himself today. Sorry Matty... Wait for daddy to play with the big tools for that!
 Verifying that the switch and it's silvery goodness was still intact, and my family and I would not be getting "Mad Hatters Disease" from my butterfingers, I unscrewed the thermostat from the wall and moved in for a closer look at the wiring. 5 wires, 5 contacts... Good stuff.. Flip to the 5 wire heating/cooling wiring diagram on my new thermostat and I immediately notice, wire colour, and terminal designation seem to have no meaning what so ever in this industry. Great... Off to the web. I was lucky enough to find two good resources here & here, which I learned a lot from (and got lots of nice warnings about dying from to boot).
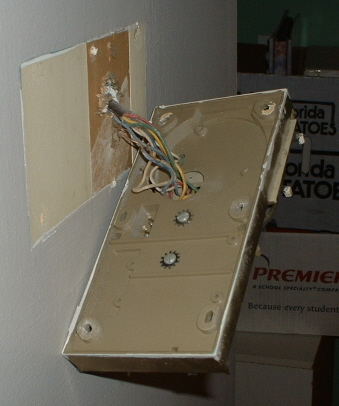 Super... Armed with my new info, I began to sort the wires out again.. But old homes have LOTS of surprises for anybody who wants to renovate. I turned over the thermostat and counted 7 wires... 7 wires? Only 5 are connected. Ok, I can deal with a few extra wires. They're obviously dead, and of no use.. One big warning from my research kept talking to me... Never assume that a wire colour is correct for the function it should perform. Right, visions of my gas furnace coming to life and blowing out the roof like santa in a hot fire come to mind. Time to head down to the furnace and verify wire colours / terminal designations right from the source. Off come the covers on the furnace, displaying even more warnings, and symbols of death and destruction. At this point in time I'm really beginning to wonder if I truly am as "handy" as I think I am... I went down there looking for a simple wiring diagram, that would tell me what various terminals on the furnace controlled..
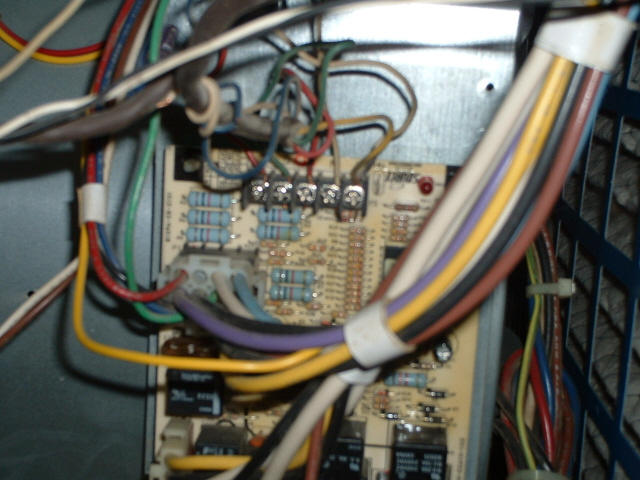 What I got was this mess of wires, and the accompanying wiring diagram. Now I did take electronics in high school, and being an Architectural Technologist, I've seen my fair share of mechanical and electrical drawings & diagrams. But those drawings come with legends, and an engineer that you can hound for hours if need be with questions. No problem.. I study the diagram, figure out what terminals go where and what they do. Then I look up on
  the circuit board, and... 4 wires from the thermostat.. Hmm.. 5 wires on old thermostat, 7 wires in wall, 4 wires to the furnace... and one wire, which must be magic, switches it's colour from black to blue somewhere between the furnace and the thermostat. Ok.. White wire, check.. Red wire, check.. Green wire, check.. Yellow wire, check. Mystery Black/blue wire? well.. turns out it's blue in the ceiling and wall, connected to the black one above the furnace, and then.. goes nowhere.. another dead wire. I write my findings down on a box (only thing handy) and head back up stairs.
 Armed with my beautiful box/notepad I affix the new thermostat to the wall, and begin attaching the wires to their proper terminals. Install the batteries and close the cover. Set the time on the thermostat, flip the switch to heat and.... damn it... run downstairs to screw the furnace fuse back into the fuse box. Voila, the heat flows from the furnace. I flip the switch to cool.. I hear the a/c compressor click.. Another job well done.
Now then... The next task..
Post Christmas clean up.. Gah..


